Product Detail Page In A Dropshipping Store: 14 Best Practices For 2020 And Beyond

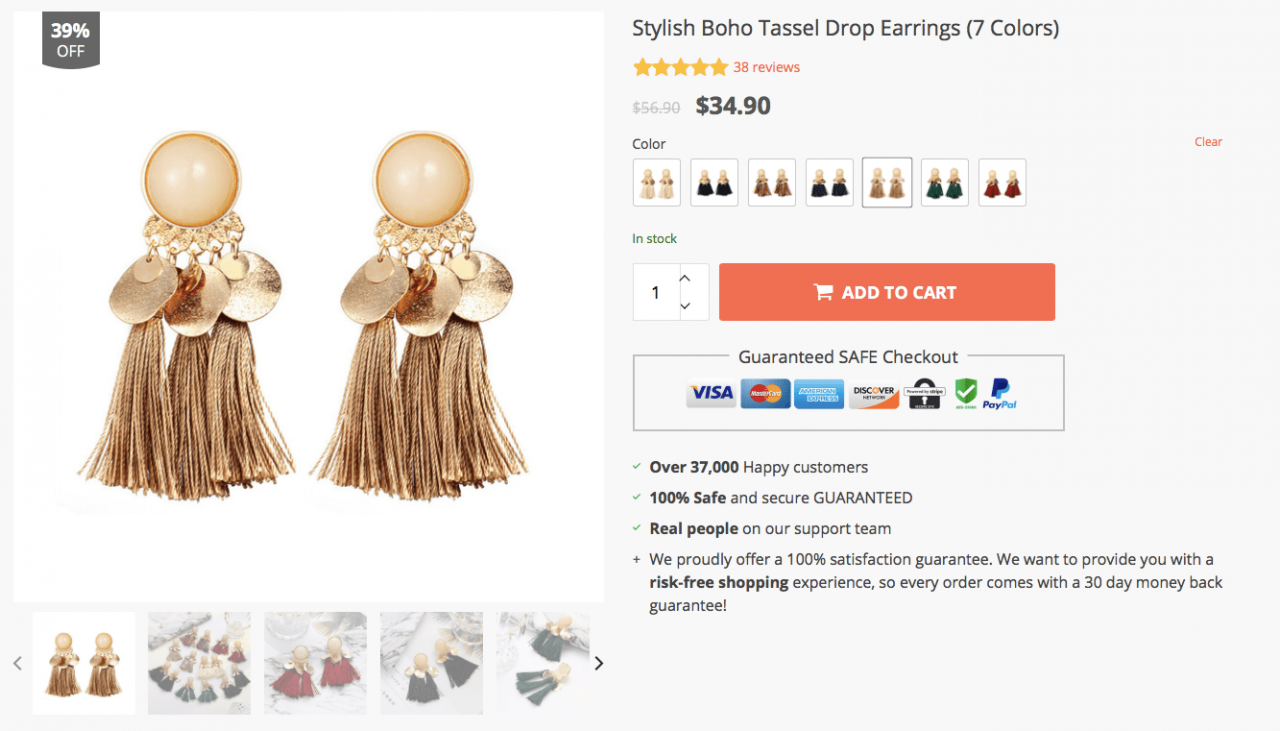
Do you want to make your dropshipping store look appealing and trustable? Then, you should pay attention to one of the main aspects of your ecommerce store that affects your sales: your product detail page. These pages should describe all the features of your products and motivate your online store visitors on making their purchases!
In this article, we will give you the best practices for product detail page conversion optimisation: all the tips are based on our own experience!
As a dropshipping store owner, you should keep in mind that your website visitors don’t have the opportunity to touch your products or ask you something in a face-to-face communication.
That means that you have to foresee their possible doubts and questions. Moreover, some of your visitors come to your webstore thanks to your paid ads, and you don’t want to waste your money on those who were up to buying from you but lost their desire after seeing ridiculous product pages.
When you have finally decided on your niche and found cool dropshipping products on AliExpress to import to your store, you need to improve product pages before publishing them. Right now, we will give you a short guide on the steps for creating the perfect product detail page. This is an update of our previous article with a 12-steps guide on product page optimization.
Step 1. Make a SEO-friendly product name
Put yourself in the customer’s’ shoes and make a nice SEO-friendly title. You should keep in mind what people type when they search similar products. Create readable and short titles without the ridiculous AliExpress mishmash of words.
Use Google Keyword planner to put searchable keywords in the product name. You could even make a document with all of the keywords related to your product categories which you will use in titles, keyword sections and category articles to improve SEO of your dropshipping store. While collecting such keywords, you will get cool ideas on what products from your niche are in demand, which of them have seasonal demand or what types of products you can add to your store.
If there are several types or colors of your item on one product detail page, add this information in parentheses. Please note that “Titles” in your product feed is the heart of Google Shopping which can effect on your CPC (cost per click) and sales.
Step 2. Change product detail page permalink
Really, don’t forget to change your permalink. We’ve seen a lot of store owners who change their titles but completely forget about their links. Permalink should be identical to the product title. Your permalink will be generated automatically when you delete the previous one and put the tick while editing your products.
You can also exclude number of types or colors, because it can be changed in the future – if your supplier, for example, widens the range of products or maybe you add similar types of items from other suppliers to your product page manually.
Step 3. Rewrite your product description
As long as you are a niche store owner, it’s highly likely that the biggest part of your potential customers are value shoppers. It means they actually don’t care that much about the price (it may depend on your price policy though), they are seeking for something special and valuable for themselves according to their own interests and hobbies. Moreover, they understand that they won’t find any of your products in a general store like Walmart or Target. They will have the feeling that store owners also share their passion and are experts in those fields if you write convincing product descriptions in the customers’ “language”.
Be careful and inventive with your description. It’s better when you keep the same writing style on all of the single product pages. And, of course, check for the grammar/spelling mistakes! You can install Grammarly extension to highlight them.
Do not include any images in the Product Description field. All photos of the item should be displayed in the Gallery and Variations sections.
We usually start with some kind of a promo text, and then add all the product specifications and other useful details in a bullet points list. Your online store visitors will be interested in the specifications of the products you offer: size, color, weight, material, etc. If you need to put any dimensions, use the type of metric system that your potential clients use. You know, it helps to improve your conversions, because your customers don’t have an opportunity to try on your clothes and they need to at least check your size chart. Don’t make your clients frustrated with the wrong or incomplete specifications in your product detail page.
Try to put words “Size Chart” before your size chart if you use our Google Merchant add-on, because it copies all the description before this line. We advise to make your size charts in tables format. Don’t leave random images with sizing info: they all look different, and they are not optimized for a mobile version. You can create all your charts in tablesgenerator (HTML mode). Put tick on “compact mode”, click “generate”, then “copy to clipboard”, and paste in your description (text mode, not visual). In the text mode, delete the “width …” part to make your charts mobile-friendly.
It would be a good idea to add videos in your product detail page. It will convince your customers that your product matches the description and looks awesome! Also, it works great for your dropshipping store SEO.
Step 4. Improve your product gallery
Move pictures from your description to the gallery. Your customers shouldn’t see any extra texts or AliExpress store logos. You can improve them with Image Editor which is a powerful built-in feature designed to make changes to product images in AliDropship Chrome Extension during the process of importing items or directly on WordPress admin panel.
As for featured image of your product, you can make a collage of product types to help customer see several variations of your product before they find themself on your ecommerce product page.
Step 5. Edit your product attributes and variations
When you use Google Merchant of Facebook Business add-ons from AliDropship team, you have to put “Color” of your product in the attributes, even if it is the only product on this page. Don’t use numbers or extra symbols in this variation. If it’s something multicolor, put several colors using slash symbol (Black/White/Red).
In your “Size” attribute for shoes, use only US sizes if you target country is the USA. Do it for kids clothes sizes, too. You can add other types of sizes in the size chart in your description field.
It would be better for your SEO and add-ons if you exclude numbers or other random bits from the names of your product types. Use names of the printed characters or other short but descriptive collocations for these types differentiation.
Step 6. Add keywords in the SEO section
SEO section for ecommerce product pages in your store will be generated automatically after you edit title – and, of course, you can put extra keywords for your product there. You can find them in the Google keyword planner. Read about other SEO optimization techniques here.
Step 7. Select right product categories
Sometimes, we see dropshipping stores with hundreds of unrelated items imported without any logical system. Confusing store structure will increase your customers anxiety and make them leave your store without making any purchase.
If you have only thematic categories (Kittens, Pandas, etc.), you need to also create your product categories (Hoodies, Mugs, T-Shirts, etc.) in order to generate product feed with the right product categories and make your dropshipping store more organized and convenient for your customers. Be careful with the contents of your product categories. No “T-Shirts” in “Jewelry” category!
Step 8. Put a believable number of orders
Avoid a suspicious number of orders, especially in the ‘New Arrivals’ category. It’s cool to be able to put any number of orders in our product page, but be careful. Can you believe that it’s possible for an item from the “New Arrivals” category to already have 1000+ orders? However, this tip doesn’t work with the ‘Best Sellers’ category – here, you should set a bigger number of orders.
Step 9. Avoid unreasonable discounts
Make sure that your discounts are reasonable. Discounts and special offers are a part of your pricing strategy that lets achieve more sales. 78% discount is certainly a good deal, but seriously, who would believe that, for example, a $15 plastic phone case could have cost almost 70 bucks? You will lose your customers’ trust if you try to manipulate them. We can advise you to keep in mind or in your notes a common price range for products you sell.
Step 10. Define your price range for product types
Well, as for the price range… What should you do before setting product prices in your store?
- Make a list of your product types/categories (hoodies & sweatshirts, cups, phone cases);
- Check prices of all these product types in stores that looks similar to yours or are popular among your target audience;
- Put price ranges in your list which includes average, min and max prices of all the product types and maximum prices without discount (“backpacks” from $23.92 to $70.90 (AVG $49.99) – sale price. MAX price before discount – $81).
So, you will be able to set prices according to your price range from your own research list, so these numbers will seem reasonable to your customers.
Step 11. Upload customer reviews
Having your reviews imported, try to look them through. The plugin grabs the necessary reviews carefully, but some untranslated misspelled words and negative feedback could occasionally sneak in. For example, reviews might mention product funny smell, shipping delays, errors in sizing, etc.
We always analyse our customers behavior, and they definitely look through reviews and check all the pictures in them. The more pictures you put in reviews, the more loyal your customer will be. Don’t forget to update your reviews from time to time. Before launching your ad campaigns, add fresh product reviews written by the customers from your target countries.
Step 12. Rate your products
Well, don’t forget to rate all of your products. Products from “Best Sellers” category should have from 4 to 5 stars. Other products should have at least 3,5 stars. Still, we usually put at least 4+ stars rating. An average rating of your product should be high. That could seem obvious to you but not everyone comes up with this idea at the very beginning.
Step 13. Don’t forget about upsell and cross-sell
Upselling is the practice of encouraging customers to purchase a comparable higher-end product, while cross-selling invites customers to buy related or complementary items.
Add from 3 to 5 products similar to yours in the “cross-selling” field, so your clients could see the products that are similar to the item they were viewing. You can add related products which might complete an outfit or make a set.
For example, these products might be related to a cute Sleeping Eye mask that the store visitor was viewing initially.
Step 14. Play with Price and Free shipping – Best Deals
If one of your suppliers has a wide range of products in his/her store, you can make nice sets, like watches and necklace, t-shirt and keychain and so on. So, these two products will come together to your client. The offer would sound like this: “Choose this cutest t-shirt for 9.99$ and get this keychain for free!”. Or, you can put zero price on one of your cheapest products and set up $5 shipping. You can create “Best Deals” category for all those types of products. Don’t ignore such an opportunity!
All these steps can impact your sales and ROI (return on investment). With our free tips and recommendations, you can make your dropshipping store much more profitable!
Do you have your own ideas about this? We would be glad to learn the best practices for product detail page optimisation that you have personally tested in your dropshipping stores!


